Weed Queen
8 hours ago
Hello again everyone. This post is brought to you by a gentle reminder that I haven't posted in awhile from my friend Maia. Thanks girl. *hugs*
It seems that most of my time in SL these days is dedicated to creating outfits, taking pics of them, working on those pics in the GIMP and posting them to my Flickr account. I know that probably doesn't sound like it should take up that much time but I would have to beg to disagree. It can take me up to an hour to figure out an outfit I want to wear then match up skin, eyes, hair and jewelry with it. Then, once that is done I have to figure out what background I want for the pic and then what pose. You might as well add another hour for that. After the pic is actually taken then I take it into the GIMP and work on it for another few hours in some cases. So, as you can imagine, a full day of my SL time can be used taking and processing a single pic. *Sigh* But, I do it because I love it and it's a wonderful creative outlet for me.
So, since SL photography seems to be my main passion at the moment I thought I might as well bring some of that here and share it with my readers. I thought that I would pass along an awesome and useful tip that I read about on another blog. My apologies for not remembering which one so that I could give them their deserved credit.
Press the Read More button below to see the tip...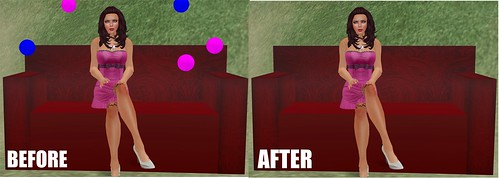
Have you ever been out exploring and found a great place with very scenic views and a ton of pose balls to play on and you are all ready to snap that perfect picture but find that the pose balls that you aren't using are cluttering it all up? Nothing ruins a romantic picture quicker than Pepto pink and baby blue pose balls laying all around you. Sure, you can edit them out after the fact in Photoshop or GIMP, but that can be a real pain in the ass and completely unnecessary.
Here's what you do to make those ugly pose balls disappear before you even take the picture.
1. You will need the Advanced option on your menu at the top of the screen. If you don't already have it, you press Control+Alt+D to make it visible. This menu option has lots of other neat functions, other than the one I'm about to discuss, but also be aware that you can screw things up pretty good from this menu so use with caution.
2. Once the Advanced option is showing, click on it to get the full drop down menu. Now, go to and select the Rendering option to get that menu and then finally the Hide Selected option. Selecting this option will make anything you select to "Edit" disappear even if you don't have permissions to edit that item.
3. Now all you have to do is a right mouse click on a pose ball and select Edit. It should disappear when you do this and then you can press the shift button and click on all the other pose balls that are in the way and they should disappear too. As long as you have the edit window open, the pose balls you selected should stay invisible.
4. If you are seeing particles coming from your hand to the first pose ball you selected then there is a remedy for that as well. Simply go back up to your top menu and select the View option and then the HIde Particles option from that drop down menu.
If you follow these steps, then you should never have to deal with ugly pose balls in your pictures again.
Best wishes everyone and thanks so much for taking the time to read my little blog!
Template Brought by :
blogger templates
3 comments:
don't most just have a /1hide and /1show command?
That is a very good question. I've always assumed that the show/hide command worked only on items that you owned or had permission to edit. I decided to put your question to the test and went back to the couch in the picture above and discovered to my surprise that I could use the hide command on it. So, you have taught me something and I appreciate that.
That doesn't mean that this tip was useless though. I went to another spot in the same sim and found a bench where the hide command didn't work and I also realized a further use for it. Please read the next blog entry for those details.
Thanks so much for reading and for your thoughtful question! :)
Thanks for your tip! Certainly I will use it when necessary
Willhelm Ewing
Post a Comment